Acrylic is a great plastic for many projects. It comes clear or in colors and can be shaped using machines, lasers, or by heating and bending it into various forms.
Types of Acrylic
Acrylic has two types: extruded and cast. Even though they look alike, the choice between them depends on what you're making.
Extruded
Extruded acrylic melts at a lower temperature compared to cast acrylic, making it ideal for vector cutting on a laser cutter. However, this lower melting point makes it less suitable for milling or drilling compared to cast acrylic

Cast
When using a laser for engraving, it's better to use cast acrylic. The engraving on cast acrylic turns out white, creating a strong contrast, while engraving on extruded acrylic remains clear and doesn't contrast as effectively.

Working with Acrylic
Flame Polishing
If the edge of a clear acrylic piece looks frosted and you want it clearer, you can flame polish it. Using a propane or MAP gas torch, gently pass the flame along the edges to melt them slightly for a transparent, polished look. However, avoid polishing edges that need to be glued, as this might weaken the joint.

Bending
You can bend acrylic using a strip heater, but those can be costly. Instead, try this workaround. If you have a toaster oven, set it to around 200º, crack the door open slightly, and position the acrylic just above the open door. Once it softens enough, bend it to the angle you need. No toaster oven? You can (carefully!) use a heat gun. To ensure straight, neat corners, bend the acrylic against the edge of wood or metal when using these DIY methods.
Bending Small Pieces
When bending a small, thin acrylic piece, you can use a soldering iron as a basic strip-heater. Put the iron in its holder, plug it in, and use a set of third hands to hold the strip just above the iron. Keep watch so the acrylic doesn't droop onto the soldering iron.

Cutting
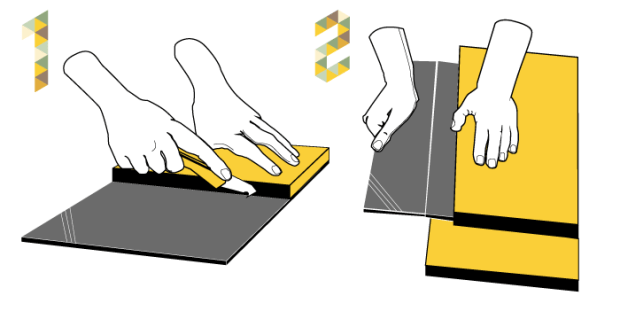
To make straight cuts in acrylic, use a plastic-scoring blade along with a straightedge as a guide. Pull the blade towards you to create a score mark. Repeat scoring along the same line and then gently snap the acrylic along the edge of a table.
Alternatively, you can use traditional blade tools like a jigsaw, band saw, or table saw. Make sure to use high tooth-count plastic-cutting blades for these tools; they work best for cutting acrylic.
Gluing
Acrylic is usually bonded using solvent-based glues like Weld-On 4. These glues soften the acrylic surfaces and chemically fuse them together, essentially creating a single piece.
To glue acrylic using solvent glue, use a squeeze-bottle applicator with a needle tip. Position the acrylic where you want it, place the needle at the joint, lightly squeeze while pulling the applicator, letting capillary action draw the glue in. Hold the pieces together (using clamps is helpful) for a few minutes. Let the glue set for 10–15 minutes before moving it, and allow 24–48 hours for the joint to fully cure.

When using solvent-based glues on laser-cut for extruded acrylic, there's a risk of cracking due to temperature differences within the acrylic. To prevent this, place the acrylic on a flat glass sheet in a shop oven (not the kitchen one!) at around 180ºF (82ºC) for about 1 hour per millimeter of thickness. Afterward, let it cool naturally. This process, called annealing, helps relieve the stress in the acrylic, reducing the chance of cracking.
Drilling
When drilling acrylic, traditional metal or wood drill bits might cause cracking. For thin sheets, opt for a step drill bit. With thicker acrylic, use conventional bits after applying masking tape over the drilling area. For extra thickness, spray WD-40 as a lubricant to clear chips and reduce heat while drilling.


Kommentare